Sections

Tuesday, October 2, 2012

Acorns: for the birds!

Earlier this week, little berry asked me to draw a beak and eyes on an acorn. I didn't really think much about it& told her I would do it later, and then today she asked again, so I did as she asked. Then I went about my day. A bit later, I came upon her playing with her acorn bowl at the nature table- actually it's bare besides the acorns she grabbed outside and a found feather for now.
It turns out she is pretending the acorns are birds- and the acorn caps are bird nests. Big acorns are the mommy&daddy birds, little acorns are baby birds. Some acorns are eggs. It seems to be arbitrarily decided.
I think this is a hilarious, creative, and super fun idea. 
The birds love to fly around our apartment and I've seen a few in places I'm not particularly fond of (the refrigerator: "it's an egg, mama!") but it is harmless and she's having a great time so I can't complain. 
What creative uses have you heard of for acorns?


Thursday, September 27, 2012

Lego Fun!

Yesterday, Little Berry and I were building with Legos and she had the fun idea to TAKE THEM OUTSIDE! So we did. I'm fortunate to have a little one who enjoys Legos as much as I did as a child, and I'm doubly lucky that we have them in abundance thanks to my efforts of stocking up on them preemptively this summer. 
We're also fortunate enough to have lots of outdoor spaces we can occupy when we want to be outside- we can be at shops, at the library, at the park, all very quickly. We chose to sit outside by a small wall and build a 'house.' 

It was SO much fun and so cute when we finished against a totally different backdrop than our living room. I am tempted to take our creation and 'lego bomb' somewhere for others to enjoy. What fun things have you created lately?

Scrappy skirt tutorial

I've noticed an easy scrappy skirt tutorial floating around the web lately and offer my version, which, while it does require sewing, ends up being simpler& easier in my opinion than knotted skirts. First gather your fabrics and iron them!
Next cut all pieces to the same length and hem the tops to make a tube for the elastic to thread through on each piece. 


Then cut the pieces into different strips of roughly the same width!
Now you're ready to thread all the pieces onto your elastic together, alternating into a funky, fun and random pattern:

Finally, when you've threaded all your fabric on, sew the elastic together, and give to your little model! Mine was moving to wiggly-ish for me to capture her picture with it on :) (It happens!) 

Hope you enjoy my scrappy skirt tutorial.  I like it because it is a fabulous way to use up scraps that are too small for anything else! Come back and share what you make with it! 

Thursday, October 6, 2011

Easy-peasy paper-marbling


One of my favorite things to do with T is get creative. From day-to-day this takes on different meanings, but today it was a simple water and coconut oil marbling craft.
I've done this before with baby oil but I don't own that anymore so coconut oil is what I used. You will need:
Paint (we used watercolors, which were very light and food coloring which gave darker colors but less variations)


*Oil (again, we used coconut oil which I melted to a liquid)
*a pan you don't mind getting oily (filled a third full of cool water)
*Paper scraps or pretty paper for making cards and tags
*a place to put your finished papers on to dry
*and of course, an energetic and joyful toddler.

To make pretty paper like ours, fill your pan a third full of cool water. Add a few drops of your oil and allow it to spread out and ball up across the water.


Then add about a teaspoon of different paints and shake the pan slightly so the oil separates and begins to roll through the paint across the pan.


Next, dip a piece of paper in the mixture and let it settle beneath the oil so the paint sticks around the spaces where the oil didn't hit, like this:


Then, lift, allow to drip a little, and place on a plate to dry.


VĂ³ila! You've made marbled paper.


Enjoy, and please make sure your whirlychild is wearing art project friendly clothes :)

Friday, September 16, 2011

Play with your food!


I know, it does seem contrary. But we've always allowed little rainbow to make her own food choices, and as an almost three year old, I can tell you it has payed off.
 If she's hungry, she tells us what she wants. If it's mealtime, we serve whatever we are having, and she eats what she wants, (and this girl EATS). So, today while I was cooking her some corn and prepping dinner, she was finger painting, I handed her a piece of corn cobb to play with and this is what she did with it. 

 
I of course then began handing her other veggies and letting her have a blast.

The mushroom was definitely her favorite, and the carrot she used like a pencil or to roll. I love the prints that resulted and would love to do something like a piece of paper pizza, print on tee shirts or cards for friends. They're fun and pretty, too.

It doesn't hurt that it kept her busy for a full thirty minutes while I prepped dinner, either :)


What veggies would your kids enjoy painting with? What other funny things make good art supplies?

*no vegetables were harmed in the making of this blog post. **by harmed I mean we didn't eat them after they were covered in paint.

Tuesday, September 13, 2011

Carrotfish?


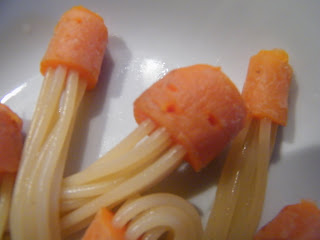
So this is not so much a tutorial as a food post because there's not much to this that you can't figure out without my help. I've been meaning to try this for a while and just finally got around to it this week: using carrots and noodles to make funny food. Here I made jellyfish, but you could make other things too.

First, I softened the cut up carrots by boiling them in a quart of water for 5minutes, then removed them and allowed them to cool so I could poke my noodles through.

 you can force the noodles into uncooked carrots but they fall out when they start boiling, probably because the carrot swells around them. This way they do not fall out while cooking.

After the carrots are cool enough to handle, press equally lengthed noodles into them all the way to *almost* the top- you want them 'secure' but not visible
Then return to the boiling water and boil for about ten minutes, drain and serve with a little butter or plain:


Monday, September 12, 2011

Mini bunting tutorial

I made this sweet mini bunting this afternoon with felt scraps, though you could make it with any fabric or even paper. Here's how you do it. It would be sweet as pie on a birthday table, in a playroom, near your child's art, draped across the ceiling, in holiday colors or all the same; really the opportunities are endless.

MATERIALS: sewing machine, scissors, needle& thread, felt, paper& pen.

Mark on a sheet of paper a line one inch wide. Use this as a guide for cutting your material. Cut out all your color combinations to this width.

Cut the pieces of felt out and then proceed to your sewing machine. Fold each one inch wide rectangle in half longways, and stitch down the top leaving a small allowance between your seam and the top of the fabric.


After you have sewn all your one inch rectangles into half inch rectangles, cut triangles out of the material trying to keep the triangles as uniform as possible. 
Next, thread each triangle via the ‘pocket’ at the top with a needle& thread onto a long pretty string or thread.
                                                 Tie loops for hanging and enjoy!